Monday, March 5, 2018

Installing Jenkins on Windows with IIS. HTTPS configuration.

This post gives you an overview how to install Jenkins on Windows using IIS and reverse proxy.

Jenkins installation

Jenkins installation is pretty simple. Go to https://jenkins.io/, download the latest version of Jenkins for Windows and install it.
By default, Jenkins will be available on 8080 port. Open your browser and navigate to http://localhost:8080. It is the address where Jenkins is running.

Setting up IIS

To setup reverse proxy you need to install the following IIS plugins:
Click on links above and you will be navigated to official installation source for both IIS plugins.

Reverse proxy for Jenkins

First of all, we need to create a new website. Create a new one with the name 'Jenkins'. After installation of IIS plugins, you should be able to configure a reverse proxy.

Follow the instructions from https://wiki.jenkins.io/display/JENKINS/Running+Jenkins+behind+IIS to setup HTTPS to HTTP reverse proxy for Jenkins.

HTTPS configuration

We will use Let’s Encrypt for certificate generation. Let’s Encrypt is a free, automated, and open Certificate Authority. And Certify tool to manage certificates.
  1. Download from https://certifytheweb.com/ and install it.
  2. Click 'New Certificate', choose your IIS site (which must have 1 or more hostname bindings set). Save your settings and click 'Request Certificate'
  3. All done! Click 'Configure Auto Renew' to set up the scheduled task for renewals.

Conclusion

Now we have a basic setup for Jenkins on IIS with HTTPS support.

Tuesday, January 30, 2018

Create static HTML website generator using Nunjucks and Gulp


In this article, we will learn how to create simple static website generator using Nunjucks and Gulp. Our implementation does not require any specific knowledge, just some basic JavaScript, and HTML. Of course, complexity depends on website functionality, but in our scenario, we will focus on the main idea of static website generation.

Tools

Project structure

|-- .editorconfig
|-- .gitattributes
|-- .gitignore
|-- src
    |-- build.sh
    |-- build.cmd
    |-- package.json
    |-- run.sh
    |-- run.cmd
    |-- gulpfile.js
    |-- build  // output directory for generated HTML
    |-- config // directory contains configuration for web server
    |-- css
    |-- img
    |-- pages // directory with web-site pages
        |-- 404.html
        |-- index.html
    |-- templates // nunjucks templates
        |-- macros
            |-- _header.html
        |-- parts
            |-- _footer.html
        |-- _globals.html
        |-- _layout.html

There are 3 files in the root of the project. .editorconfig is the interesting one. EditorConfig helps developers define and maintain consistent coding styles between different editors and IDEs. More information about EditorConfig could be found using the following link http://editorconfig.org/.

Building common layout 

Nunjucks is templating engine with block inheritance, auto-escaping, macros, asynchronous control, and more. To build our website we will start with defining master page layout using nunjucks way of templating. Link to nunjucks templating documentation: https://mozilla.github.io/nunjucks/templating.html

_layout.html

<!DOCTYPE html>
<html lang="en">
<head>
  <meta charset="UTF-8">
  <meta name="viewport" content="width=device-width, initial-scale=1.0">
  <meta http-equiv="X-UA-Compatible" content="ie=edge">
  <link rel="stylesheet" href="/css/style.css" />
  {% block head %}
    <title>My site</title>
    <meta name="keywords" content="">
    <meta name="description" content="">
  {% endblock %}
</head>
<body>
  {% block header %} {% endblock %}
  <div class="main">
    {% block content %} {% endblock %}
  </div>
  {% include "parts/_footer.html" %}
  <!-- Common scripts placeholder. -->
  {% block scripts %}
  {% endblock %}
</body>
</html>

As you can see layout contains the reference to _footer.html. Nunjucks allows you to extract several parts of  HTML markup into reusable components.

_footer.html

{% import '_globals.html' as globals %}

<footer class="footer">
 Check out website <a href="{{globals.website_url}}">{{globals.website_url}}</a>
</footer>

Website shared settings

It is useful to have one common place where you can store global settings for your website. For such purposes, we will create the_globals.html file, where will store shared configuration. On previous code snippet, you can find an example how to use global settings.

_globals.html

{% set website_url = "http://www.maniuk.net" %}

Creating page

All pages go to pages directory. The page might extend any of specified base layouts. Following code example shows markup for a simple index page.

index.html

{% extends "_layout.html" %}
{% import 'macros/_header.html' as header %}

{% block head %}
  <title>My site</title>
  <meta name="keywords" content="">
  <meta name="description" content="">
{% endblock %}

{% block header %}
{{ header.renderHeader('index') }}
{% endblock %}

{% block content %}
Hello world!
{% endblock %}

We want current page to be highlighted in navigation menu so we will create nunjucks macro to achieve that.

_header.html

{% macro renderHeader(activePage='index') %}
<header class="header">
  <div class="logo">
    <a href="/">
      <img src="/img/logo.png" alt="logo" />
    </a>
  </div>
  <nav class="navigation">
    <ul class="navigation-list">
      <li class="navigation-list-item {%if activePage == 'index' %}current{% endif %}">
        <a href="/" class="navigation-list-link">Index</a>
      </li>
      <li class="navigation-list-item {%if activePage == '404' %}current{% endif %}">
        <a href="/404.html" class="navigation-list-link">404 Page</a>
      </li>
    </ul>
  </nav>
</header>
{% endmacro %}

Building project with gulp

First of all, we need to specify the list of dependencies we need for a successful build.

"devDependencies": {
    "browser-sync": "^2.18.13",
    "gulp": "^3.9.1",
    "gulp-autoprefixer": "^4.0.0",
    "gulp-clean-css": "^3.9.0",
    "gulp-concat": "^2.6.1",
    "gulp-htmlmin": "^3.0.0",
    "gulp-imagemin": "^3.3.0",
    "gulp-nunjucks-render": "^2.2.1",
    "gulp-sass": "^3.1.0",
    "gulp-uglify": "^3.0.0"
  },

End now it is time for a gulpfile.js file with build configuration.

gulpfile.js

var gulp =            require('gulp'),
    browserSync =     require('browser-sync').create(),
    sass =            require('gulp-sass'),
    uglify =          require('gulp-uglify'),
    autoprefixer =    require('gulp-autoprefixer'),
    cleanCSS =        require('gulp-clean-css'),
    imagemin =        require('gulp-imagemin'),
    nunjucksRender =  require('gulp-nunjucks-render'),
    concat =          require('gulp-concat'),
    htmlmin =         require('gulp-htmlmin');

// Static Server + watching scss/html files.
gulp.task('serve', ['sass', 'nunjucks-html-watch'], function() {
    browserSync.init({
        server: './build'
    });

    gulp.watch('css/dev/*.scss', ['sass']);
    gulp.watch('./**/*.html', ['nunjucks-html-watch'])
});

gulp.task('sass', function() {
    return gulp.src('css/style.scss')
        .pipe(sass())
        .pipe(autoprefixer({
            browsers: ['last 2 versions'],
            cascade: false
        }))
        .pipe(cleanCSS())
        .pipe(gulp.dest('./build/css'))
        .pipe(browserSync.stream());
});

gulp.task('compressJs', function () {
    return gulp.src('js/*.js')
        .pipe(uglify())
        .pipe(gulp.dest('build/js'))
});

gulp.task('compressImage', function () {
    return gulp.src('img/**')
        .pipe(imagemin({
            progressive: true,
            optimizationLevel: 3
        }))
        .pipe(gulp.dest('build/img'))
});

gulp.task('nunjucks', function() {
  return gulp.src('pages/**/*.+(html|nunjucks)')
    .pipe(nunjucksRender({
      path: ['templates']
    }))
    .pipe(htmlmin(
      {
        collapseWhitespace: true,
        removeComments: true
      }))
    .pipe(gulp.dest('build'))
});

// Create a task that ensures the `nunjucks` task is complete before reloading browsers.
gulp.task('nunjucks-html-watch', ['nunjucks'], function () {
  browserSync.reload();
});

gulp.task('vendors-scripts', function() {
  return gulp.src([
      './node_modules/jquery/dist/jquery.min.js'])
    .pipe(concat('vendors.js'))
    .pipe(gulp.dest('build/js/'));
});

gulp.task('copy-files', function() {
  gulp.src([
    'config/web.config'
  ])
  .pipe(gulp.dest('build'));
});

// Compile project.
gulp.task('build-project',
  ['sass', 'compressImage', 'compressJs', 'nunjucks', 'vendors-scripts', 'copy-files']);

// Compile and start project.
gulp.task('default', ['build-project', 'serve']);

Local development

I find it handy to use gulp build-in HTTP server, developers can easily emulate a server on their machine. Following bash script runs simple HTTP server for local development.

run.sh

#!/usr/bin/env bash
echo "Installing dependencies..."
npm install

echo "Running gulp"
./node_modules/.bin/gulp

Conclusion

Gulp and Nunjucks are great tools and it is possible to create static site generator using them. Full source code could be found on GitHub repo: https://github.com/aliakseimaniuk/blog-examples/tree/master/static-site-generator.

Thursday, November 16, 2017

Fix Jenkins SMTPSendFailedException on Windows and Ubuntu 16.04

Intro

By default, Jenkins has disabled mail.smtp.starttls option and if you want to send notifications through any SMPT service which requires TLS, for example, through Gmail SMTP server, you need to enable this option. If the option is disabled you receive the following exception:

com.sun.mail.smtp.SMTPSendFailedException: 
530 5.7.0 Must issue a STARTTLS command first. q15sm1393424wra.91 - gsmtp 

Fixing SMTPSendFailedException on Windows

1. Navigate to Jenkins installation folder. To find out exact installation folder you need to navigate to 'Manage Jenkins' page and check 'Home directory' property. By default home directory should be 'C:\Program Files (x86)\Jenkins'
2. Open 'jenkins.xml' and add '-Dmail.smtp.starttls.enable=true' to arguments. See XML-code snippet below:

<executable>%BASE%\jre\bin\java</executable>
<arguments>-Xrs -Xmx256m -Dhudson.lifecycle=hudson.lifecycle.WindowsServiceLifecycle -Dmail.smtp.starttls.enable=true -jar "%BASE%\jenkins.war" --httpPort=8080 --webroot="%BASE%\war"</arguments>

3. Restart Jenkins by navigating to {base_jenkins_url}/restart URL.

Fixing SMTPSendFailedException on Ubuntu 16.04

Basically, the steps are pretty the same as for Windows. First of all you need to figure out where Jenkins stores it configuration. By default, it should be '/etc/default/jenkins' file.

1. Open '/etc/default/jenkins' file.
2. Add '-Dmail.smtp.starttls.enable=true' to Java arguments.

# arguments to pass to java

# Allow graphs etc. to work even when an X server is present
JAVA_ARGS="-Djava.awt.headless=true -Dmail.smtp.starttls.enable=true"

3. Restart Jenkins by navigating to {base_jenkins_url}/restart URL.

Wednesday, October 18, 2017

Configure Jenkins and Xvfb plugin on Ubuntu

Introduction

Some build workflows in Jenkins require the display. If you run the build of Java application in console following exception might happen.
Exception in thread "main" java.lang.InternalError: Can't connect to X11 window server using '' as the value of the DISPLAY variable.
I found a solution how to fix it using  Xvfb.

Installation of Xvfb

1. To install Xvfb run following command in terminal.
sudo apt-get update
sudo apt-get install xvfb

Installation of Xvfb Plugin

1. I have an assumption that Jenkins is installed and running on Ubuntu 16.04. Please follow installation instructions to install Jenkins in case you do not have running Jenkins. 
2. Install Xvfb plugin. Please follow instructions for plugins installation.


Configuration of Xvfb Plugin

If plugin configured incorrectly you might have the following exception:
ERROR: No Xvfb installations defined, please define one in the configuration. Once defined you’ll need to choose one under Advanced options for Xvfb plugin job settings and save job configuration.
To fix it:
1. Navigate to  Manage Jenkins → Global Tool Configuration → Xvfb installation
2. Set Name: Xvfb
3. Set Directory in which to find Xvfb executable: /usr/bin


Xvfb installation

Troubleshooting

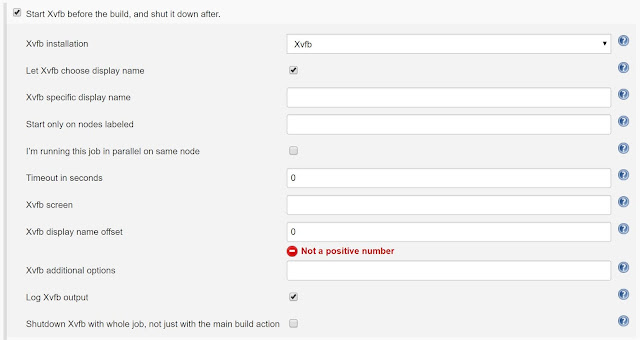
1. In case you still have the issue, try to play with the configuration of 'Start Xvfb before the build, and shut it down after.' step. E.g.

'Start Xvfb before the build, and shut it down after' step

Tuesday, October 17, 2017

Recursively copy files of a specific folder into a single flat folder on Windows

Recursively copy files of a specific folder into a single flat folder on Windows

Use following script, with appropriate folders.

@echo off
for /r "{full path to source dir}" %%a in (*) do copy "%%a" "{full path to flatten dir}"

Thursday, October 5, 2017

VirtualBox: Accessing shared folder from Ubuntu guest

Preconditions

  • VirtualBox is installed.
  • Ubuntu 16.04 is running in VirtualBox.

Instruction

1. Create shared folder. Click settings → Shared Folders → Click 'Add a new shared folder' button.

Shared folders

2. Specify name and path to the folder you want to make shared.

Add shared folder

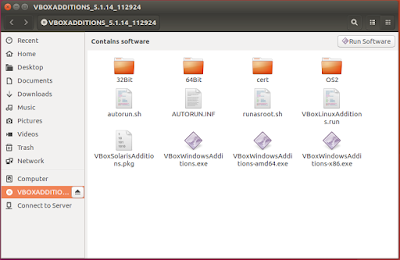
3. In VirtualBox click 'Devices' → Insert Guest Additions CD image → Run with sudo permissions VBoxLinuxAdditions.run program from mounted disk.

VBoxLinuxAdditions.run

4. Make folder

sudo mkdir /home/{user_name}/shared-folder 

5. Mount the folder with the command:

sudo mount -t vboxsf {folder_name_from_step_2} /home/{user_name}/shared-folder

6. Done.