Sunday, August 21, 2016

.NET async repository using MongoDb

Intro

In this article we will learn how to create async repository for MongoDB as datasource. More info about MongoDb you can find using following link https://www.mongodb.com/. All code from this article you can find using link https://github.com/aliakseimaniuk/MongoRepository.

Repository interface

Instead of classic CRUD methods I prefer to use next repository interface. 

using System;
using System.Collections.Generic;
using System.Linq.Expressions;
using System.Threading.Tasks;
using MongoRepository.Domain.Entities;

namespace MongoRepository.Domain.Repositories
{
    public interface IRepository<TEntity, in TKey> where TEntity : IEntity<TKey>
    {
        Task<TEntity> GetByIdAsync(TKey id);

        Task<TEntity> SaveAsync(TEntity entity);

        Task DeleteAsync(TKey id);

        Task<ICollection<TEntity>> FindAllAsync(Expression<Func<TEntity, bool>> predicate);
    }
}
To be sure that entity is the good fit for the repository we introduced the IEntity interface. Repository entity should implement the specified interface.
namespace MongoRepository.Domain.Entities
{
    public interface IEntity<TKey>
    {
        TKey Id { get; set; }
    }

    public interface IEntity : IEntity<string>
    {
    }
}

Base repository implementation

As we created generic repository interface, we expect that all the repositories will work in the same way. Please find below the implementation of base repository.

using System;
using System.Collections.Generic;
using System.Linq.Expressions;
using System.Threading.Tasks;
using MongoDB.Bson;
using MongoDB.Driver;
using MongoRepository.Domain.Entities;
using MongoRepository.Domain.Repositories;

namespace MongoRepository.Persistence.Repositories
{
    public abstract class BaseMongoRepository<TEntity>
        : IRepository<TEntity, string> where TEntity : IEntity
    {
        protected abstract IMongoCollection<TEntity> Collection { get; }

        public virtual async Task<TEntity> GetByIdAsync(string id)
        {
            return await Collection.Find(x => x.Id.Equals(id)).FirstOrDefaultAsync();
        }

        public virtual async Task<TEntity> SaveAsync(TEntity entity)
        {
            if (string.IsNullOrWhiteSpace(entity.Id))
            {
                entity.Id = ObjectId.GenerateNewId().ToString();
            }

            await Collection.ReplaceOneAsync(
                x => x.Id.Equals(entity.Id),
                entity,
                new UpdateOptions
                {
                    IsUpsert = true
                });

            return entity;
        }

        public virtual async Task DeleteAsync(string id)
        {
            await Collection.DeleteOneAsync(x => x.Id.Equals(id));
        }

        public virtual async Task<ICollection<TEntity>> FindAllAsync(
            Expression<Func<TEntity, bool>> predicate)
        {
            return await Collection.Find(predicate).ToListAsync();
        }
    }
}
You might notice, that BaseMongoRepository class has abstract property Collection. This property is representing the data collection of the entities and should be implemented in the derived classes.

Custom entity repository

Previously I mentioned that all derived from BaseMongoRepository class classes  should have Collection property. To get that I created MongoDataContext class.

using System.Configuration;
using MongoDB.Driver;

namespace MongoRepository.Persistence
{
    public class MongoDataContext
    {
        public MongoDataContext()
            : this("MongoDb")
        {
        }

        public MongoDataContext(string connectionName)
        {
            var url = 
                ConfigurationManager.ConnectionStrings[connectionName].ConnectionString;

            var mongoUrl = new MongoUrl(url);
            IMongoClient client = new MongoClient(mongoUrl);
            MongoDatabase = client.GetDatabase(mongoUrl.DatabaseName);
        }

        public IMongoDatabase MongoDatabase { get; }
    }
}

Finally we are ready to implement our custom repository class. I will create PersonRepository as example.

using MongoDB.Driver;
using MongoRepository.Domain.Entities;

namespace MongoRepository.Persistence.Repositories
{
    public class PersonRepository : BaseMongoRepository<Person>
    {
        private const string PeopleCollectionName = "People";

        private readonly MongoDataContext _dataContext;

        public PersonRepository(MongoDataContext dataContext)
        {
            _dataContext = dataContext;
        }

        protected override IMongoCollection<Person> Collection =>
            _dataContext.MongoDatabase.GetCollection<Person>(PeopleCollectionName);
    }
}

namespace MongoRepository.Domain.Entities
{
    public class Person : IEntity
    {
        public string Id { get; set; }

        public string FirstName { get; set; }

        public string LastName { get; set; }
    }
}

MongoDb settings


MongoDb version: 3.2.5
C# MongoDb driver version: 2.2.4

<?xml version="1.0" encoding="utf-8"?>
<packages>
  <package id="MongoDB.Bson" version="2.2.4" targetFramework="net452" />
  <package id="MongoDB.Driver" version="2.2.4" targetFramework="net452" />
  <package id="MongoDB.Driver.Core" version="2.2.4" targetFramework="net452" />
</packages>
Tuesday, August 16, 2016

QA: Equivalence Partitioning as specification-based test design technique

Let start from definition, per ISTQB glossary:
Equivalence partitioning: a black-box test design technique in which test cases are designed to execute representative from equivalence partitions. In principle, test cases are designed to cover each partition at least once. 
 What does it mean?

Inputs, outputs, internal values and time-related values should be split into equivalent groups, where values on boundaries and inside of group will lead to the same result.
Each equivalence partition should be tested with valid and invalid values at least once. Multiple values for a single partition doesn't increase the coverage percentage.

Benefits: number of tests significantly descrise

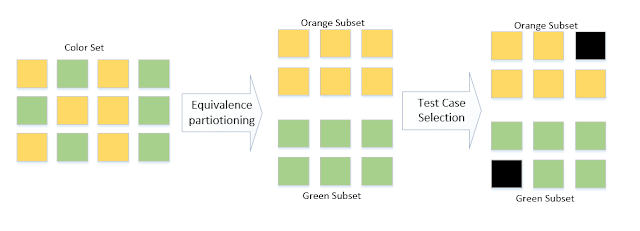
Data set was split into 2 subset with selection of test case of each subset

Equivalence partitioning

Data set was split into 2 major subsets and 2 subsets of one of major subsets

Equivalence partitioning

Difficulties which can be faced: participation was identified incorrectly. That could mean that invalid values accepted or valid values rejected by the system.

Avoid errors:
a. Subsets shouldn't have a common elements. Each sub set should have unique data elements
b. Subsets shouldn't be empty. Element should exists in data set
c. Subsets union should be equivalent to original set

Types of defect: functional defects


Monday, August 15, 2016

Get IP address by MAC address in C#

Sometimes it happens that you need to access device in the network by IP address. But unfortunately, it is not every time possible, e.g the device does not have static IP. In such case you can use device's MAC address to find it in the network.

Address Resolution Protocol 

Displays and modifies entries in the Address Resolution Protocol (ARP) cache, which contains one or more tables that are used to store IP addresses and their resolved Ethernet or Token Ring physical addresses. There is a separate table for each Ethernet or Token Ring network adapter installed on your computer.
So we are going to use following arp-command to get all the entries and filter them by specified MAC address.

arp -a

For more option use following link ARP Documentation.

.NET implementation


ArpEntity.cs


namespace ArpExample
{
    public class ArpEntity
    {
        public string Ip { get; set; }

        public string MacAddress { get; set; }

        public string Type { get; set; }
    }
}

ArpHelper.cs


using System.Collections.Generic;
using System.Diagnostics;
using System.Linq;
using System.Text.RegularExpressions;

namespace ArpExample
{
    public class ArpHelper
    {
        public List<ArpEntity> GetArpResult()
        {
            var p = Process.Start(new ProcessStartInfo("arp", "-a")
            {
                CreateNoWindow = true,
                UseShellExecute = false,
                RedirectStandardOutput = true
            });

            var output = p?.StandardOutput.ReadToEnd();
            p?.Close();

            return ParseArpResult(output);
        }

        private List<ArpEntity> ParseArpResult(string output)
        {
            var lines = output.Split('\n').Where(l => !string.IsNullOrWhiteSpace(l));

            var result =
                (from line in lines
                 select Regex.Split(line, @"\s+")
                    .Where(i => !string.IsNullOrWhiteSpace(i)).ToList()
                    into items
                 where items.Count == 3
                 select new ArpEntity()
                 {
                     Ip = items[0],
                     MacAddress = items[1],
                     Type = items[2]
                 });

            return result.ToList();
        }
    }
}

IpFinder.cs


using System.Collections.Generic;
using System.Linq;
using System.Text.RegularExpressions;

namespace ArpExample
{
    public class IpFinder
    {
        public string FindIpAddressByMacAddress(string macAddress)
        {
            List<ArpEntity> arpEntities = new ArpHelper().GetArpResult();

            return arpEntities.FirstOrDefault(a => a.MacAddress == macAddress)?.Ip;
        }
    }
}

Troubleshooting 

Recently I figured out that the solution described in the article sometimes might fail. I wrote the article with the fix. Please find it using the link Get IP address by MAC address in C#. Updating ARP table

Sunday, August 14, 2016

Source code beautifier / Syntax Highlighter Using PrismJs for Blogger

Preparing this post I created simple syntax highlighter using prismjs http://prismjs.com/. Please find below some instructions how to use it.
Steps:

  1. Copy code to 'Source code' text field
  2. Select language
  3. Select theme
  4. Check 'Include style' checkbox. If you have already added some highlighted code to you blog page, you might uncheck 'Include style' checkbox to prevent css-styles duplication on your page.
  5. Click 'Transform' button
  6. Copy and paste generated code to your blog page. 

Source code
Highlighted code
Select language:
Select theme:
Include style:

QA: Estimation Techniques

There is bunch of techniques which can be used to estimate QA work.

  • Industry averages, metrics, predictive models. Usually it is 30% of development work, but this is the most tricky estimates, for example developers changed store procedure this is approximately 5-8hrs of work for developer, so QA will be 1.5-2.5hrs. For QA this could mean to do full regression of application because this store procedure is using across application.
  • Tester-developer ratio. This technique usually based on organization history. For example 4 developers generate work for 1 QA engineers, so QA time will be 0.25 of full development work.
  • Experience (intuition, guess) based estimate. 
  • Team estimation sessions. Estimates can be more accurate estimates when dev lead and BA participate in estimation sessions, more details can be provided and took into account.
  • Test case based technique. This estimates can be used only when test cases created, or you can guess how many test cases you will create.
  • Bottom-up approach of estimates. Work is breaking down on tasks, each task can be estimated individually and sum of tasks will be overall project estimates.
In addition to provided techniques add additional time for bugs creation and verification, for updating test case, and 30% of estimated time add as risks. Usually when QA starts estimate functionality no one know how this functionality will behave at the result. Better way to overestimate and use less time, than underestimate and use much more time of testing under pressure and not founded bugs.